Setting Up Custom Robots Header Tags in Blogger:
Blogger’s developers team always working hard to enhance its features and usability. In blogger’s new interface developers added many fresh features to build it more SEO friendly. One of the new features launched by blogger’s developers is Custom Robots Header Tags. This is in fact a useful tool which helps us to select which part of our blog should be indexed and which must be avoided from indexing in search results. This tool plays huge role in our blog’s SEO. Using it correctly can increase our blog ranking that helps us to increase more visitors from search engines and hence our blog page views will also increase. In this lesson you will be taught how to setup custom robots headers tags in blogger. Let’s get startedFirstly allow this option from your blogger settings and then I will advise you how to use it.
1. Log in to your blogger account.2. Now navigate to Setting >> Search Preferences
3. Click on edit link beneath the Custom Robots Header Tags section as shown in below screenshot.
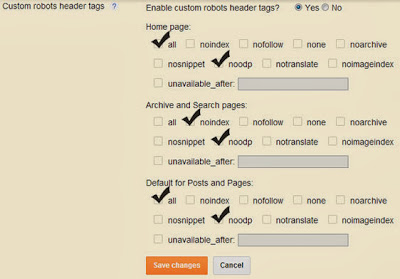
4. Once you click on the edit link you will see a lot of options. Simply mark on the options as shown in the below image.
5. Now click on “”Save changes” button.
6. You are done!


0 comments:
Post a Comment